How to digitize a 8mm film collection at low cost
I recently took on digitizing the 8mm films of my grandparents. My grandfather having made his career at Kodak, he was more predisposed to take and store a lot of memories during his life (more than 1 hundred 8mm films, at least the ones he kept). I hope the content of this article will help you to decide what’s the best approach in your case!
1. The options to digitize the 8mm films
In this article, I’ll mostly discuss how to digitize the films yourself with some amateur equipment.
But first, let’s list the possibilities to get the job done:
- 💸 Pay a company. They have better equipment and they know how to handle different situations (clean the film, repair it if required, adjust movie colors, stabilize it, etc). However, the price is often steep as digitizing requires manual labor. The price often ranges 30-120€ per film depending on the bobbin length (5 min, 15 min, 30 min). You can find companies near you by searching « digitizing 8mm CITY ». If you live in the US, it seems Kodak Digitizing offers an affordable service.
- 📽️ Display the film on a white screen and record it. If you have a 8mm projector, then it may be the most affordable and quickest way. If you don’t, then buying a second-hand projector may still be cheaper than the third option. Project the films on a white wall (or just an A4 piece of paper is enough), and use a small camera or modern smartphone to record it.
- 🖐️ Use a converter scanner. Last but not least, you can buy a converter scanner and convert the films into digital videos frame by frame. The scanner scans each frame of the film, and combines them into a video. This option costs 200-500€ depending on the scanner you find (plus, you can (re)sell it once you’re done).
2. Should I digitize the 8mm films myself, or pay for the service?
You should do some calculations to determine if it’s more cost-effective to do the job yourself or not. Some of the thinking is still relevant even if you don’t have much money, as it could save you some time.
Determine which 8mm films should be digitized. Even if you only have a dozen of them, you may not need all of them. The easiest way to determine this is by using a projector. You can find some used ones at an affordable price (~50€), and you may contact some associations to borrow one.
Calculate how much it would cost to convert the (chosen) films with a paid service. The cost is almost always related to the diameter of each reel (and so of the duration). 7,5 cm is ~15 min, 10 cm is ~30 min, etc. Plus, take into account that a paid service will often have side services like cleaning the film and doing some post edition (but not always).
Compare the professional cost versus the do-it-yourself cost (without speaking about the time you’ll spend on it). I would say that for a dozen films, it may not be worth it (doing it yourself).
Whatever you decide, starting with step 1 may be a good idea, considering the process can take weeks for a hundred films.
3. How to use a 8mm converter scanner
As you probably understood, we’re going to focus on the third option, which is: using a scanner and digitizing the films by yourself.
Warning : it’s a long and tedious process. However when you have dozens or hundreds of films to digitize, it’s the only affordable option. Depending on your country, paying a company to achieve the same job would cost 3k-12k€ for 100 hundred films (rough estimation as it mostly depends on the total duration). But you should quickly understand why doing it yourself takes time and patience.
Good to know:
- Whether you have « classic » 8mm films or « super » 8mm films, it should be fine ; most scanners handle both cases.
- It won’t digitize the sound! which is often not a problem (as most films don’t have any), but keep that in mind.
- It’ll crop some of the film (i.e., you’ll lose some of the pixels). A 8mm frame is ~ 4,5x3,3mm (1,36 ratio), while the digitized movie should be ~ 1440 × 1080pixels (1,33 ratio). Plus you’ll zoom in to have some « safe » margins.
- While the output will be stored as a 1440 × 1080 pixels movie (or even higher resolution), don’t expect amazing quality: there will be some visible grains due to the low quality of the equipment.
- Most scanners can’t handle 30 min+ reels (like the one I bought). But there is a trick if you own a projector (see further in the article).
- Colors won’t be as good as with professional equipment.
- All films don’t have the same framerate, and your equipment may not care. So you may want to adjust it post-recording.
But honestly, the overall result is quite enough for most people. And if you need better quality for some films, then you can hire a professional.
3.1 What 8mm scanner to buy?
It’s a niche market, meaning there won’t be a lot of competitors. I won’t list all the brands as I couldn’t test and compare them. The one I bought and used is the « reflecta 8mm scanner », also known as « braun 8mm scanner » (same company, and 100% same scanner).
The price should range between 300-500€ for a new one, and half less for a second-hand one. Buying a new one doesn’t seem mandatory, but you should try it out before buying it (ask the vendor, and bring a film of yours). Note that it should be easy to sell it afterward, so keep that in mind if you have a tight budget.

If you’re lucky to find the « reflecta super 8 scanner », then go for it! It’s more expensive (and not on the market anymore?), but it allows scanning bigger reels (the 30 min ones). There is an alternative if you have some 30 min films to digitize, we’ll mention it later.
3.2 How long does it take to digitize a 8mm film?
A regular 8mm film has 16 frames per second, and the Reflecta/Braun scanner converts 2 frames per second. So in theory it’s x9 the film duration. For instance, if your film is a 15 min one (~ 7,5 cm diameter), then it should take up to 135 minutes.
As a matter of consequence, if you have 25 hours of movies to convert, it should take almost 10 entire days, and so probably more like 1 month of work as all isn’t automated.
But do not fear! You’ll gain some valuable outputs from this.
3.3 How Does It Work?
There is a small learning curve, but then you easily jump from one to another.
Place the reel you want to digitize on the left, and the empty reel on the right. One empty reel is included within the box as it’s not common to find anymore.
Take the film and place it in the notch as presented in the documentation. The goal is to make sure the cogwheel will hook into the notches of the film to make it advance frame by frame (that’s the purpose of the small holes).
Pull a bit the film to hang it inside the empty reel.
Configure the machine. The most important part is to properly adjust the x/y/z axes of the sensor. As mentioned early in the article, you can’t easily digitize the entire frame as the ratios are different. So I advise you to zoom in (z axis), and mostly play with the x/y axes to be at the center. The alternative would be to zoom out to see some of the previous and next frames, and do some post-processing cropping of the video.
Record and wait! I strongly advise starting with shorter films in order to gain some experience.
Good to know:
- This scanner supports an SD card (to store the videos) which isn’t included. Some third-party sellers include one. The alternative is to connect the scanner to a computer, but it’s less convenient. 32 Go would be more than enough, even 4-8 Go would do it as you’ll probably transfer the files to your computer from time to time.
- You’ll hear a « click » each time the machine move to another frame. It can’t be helped, and you’ll have to put up with this annoying sound. The good thing is that the sound will feel different once the reel reaches the end, so you know when to stop the scanner.
- Yes, unfortunately, the machine may not stop itself when the film has finished processing! The film often gets stuck on the end 95% of the time. So if you plan to sleep during a conversion, you may have to trim it later.
- You can’t pause and resume the digitization, else it’ll create multiple files. But you can merge several videos into one with some tools!

Video digitized from 8mm film, then resized to 480x360 and compressed in h265. Here the file is presented in webp.
3.4 Resize and compress 8mm movies
From my experience, the output resolution of the video is exaggerated as a marketing aspect. I don’t think you can recover all the beauty of a 8mm film from this kind of equipment (meaning you need professional equipment for the best films). To simplify: you don’t need to store the videos in 1440 × 1080 px resolution. It takes ~1Go for a 10 min video, which seems excessive.
I advise you to resize and compress each video with ffmpeg . A 480 × 360 px resolution is enough and should take ~50Mo for a 10 min video (so x20 less).
- Here is a command line to do the job:
ffmpeg -i input.mp4 -vcodec libx265 -crf 28 -filter:v scale="trunc(oh*a/2)*2:360" -c:a copy output.mp4. - And if you want to convert all videos within a folder :
for i in ./source-folder/*.mp4; do ffmpeg -i "$i" -vcodec libx265 -crf 28 -filter:v scale="trunc(oh*a/2)*2:360" -c:a copy « ./output-folder/$(basename "$i" .mp4)".mp4 ; done.

As you can see from the image above, there will be some quality loss. However it’s not much noticeable in the video itself and the size gain is worth the trouble if you store dozens of them.
Make sure to copy the videos before trying to compress them!. (As you probably already have spent hours converting the films, so you don’t want to loose the originals yet).
3.5 Manage big reels with reflecta scanner
As mentioned earlier, this reflecta scanner only supports reels with a diameter up to 12,5 cm. So for the films of 30 min+ (reels of ~ 17,5 cm), you need a workaround.
Solution 1: If you are handy, you could build a small pole which would support the reel and allow it to turn (as the machine is doing the job to change the frames).
Solution 2: If you have a projector, then place it next to the machine (as in the photo below).
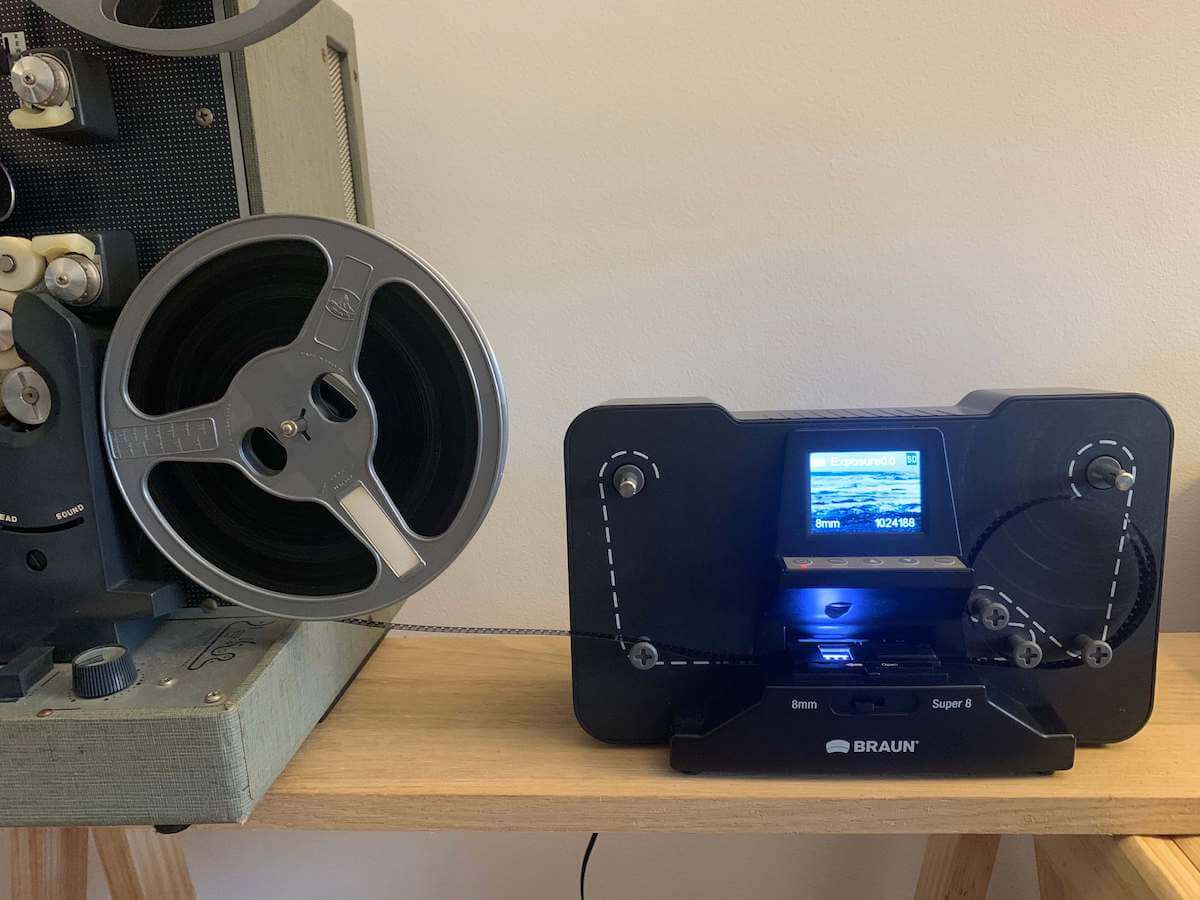
For both solutions,
- You won’t use the empty reel. Yes, the films will scatter on the ground (sigh).
- You’ll either have to rewind manually (outch), or use a projector (which usually has a mode for this part).
I hope this article was helpful to you.
Author Vincent Germain